1. What Is a Generator Transfer Switch Kit (and Why You Need It)
A generator transfer switch kit lets you safely connect a portable or standby generator to your home’s electrical system. Instead of running extension cords everywhere, you flip a switch and selected circuits are powered by the generator.
A typical kit includes:
- Transfer switch (manual or automatic)
- Wiring harness / whip
- Power inlet box (for portable generators)
- Breakers or switches for individual circuits
- Mounting hardware & labels
- Installation & wiring diagram from the manufacturer
Why you should not skip a transfer switch
- It prevents backfeeding power into the grid (which can kill a lineman or fry equipment).
- It lets you choose specific circuits (fridge, lights, furnace, well pump, etc.).
- It keeps your system code-compliant and insurable.
- It’s much more convenient than cords.
2. Can I Install a Generator Transfer Switch Myself?
Short answer: sometimes, yes – but only if:
- You are comfortable working around electrical panels.
- You understand how to shut off and verify power is off.
- Local codes allow homeowner electrical work.
- You pull permits if required.
You should hire a licensed electrician if:
- You’re not experienced with electrical work.
- Your main panel is old, crowded, or questionable (aluminum wiring, corrosion, DIY mess).
- Local regulations require licensed installation.
- You’re installing an automatic transfer switch tied to a standby generator.
Safety disclaimer: This guide is for educational purposes. Electrical work can be dangerous or fatal if done incorrectly. Always follow the manufacturer’s generator transfer switch installation instructions, local electrical codes, and consult a licensed electrician if you’re unsure.
3. Planning Your Generator Transfer Switch Install
Step 1 – Decide manual vs automatic
- Manual transfer switch kit (most common for portable generators):
– You plug in the generator and flip switches manually when the power goes out.
– Cheaper, easier to install, popular with homeowners. - Automatic transfer switch (ATS):
– Used with permanently installed standby generators.
– Senses power loss, starts generator, and switches power automatically.
– More complex and almost always installed by electricians.
This guide focuses mainly on manual generator transfer switch kit installation.
Step 2 – Choose which circuits you’ll power
Most manual kits are 6–10 circuits. Common choices:
- Refrigerator / freezer
- Gas or oil furnace blower
- Well pump or sump pump
- A few lighting circuits
- Home office / Wi-Fi
- Garage door opener
- A few general-purpose outlets
Tip: Look at your breaker panel and note the amp rating and what each breaker feeds. Your generator’s wattage must be able to support the total running load plus some margin.
Step 3 – Check compatibility
Before buying or installing:
- Make sure the kit is compatible with your panel type (Siemens, Square D, Eaton, etc.).
- Verify the amperage rating (commonly 30A or 50A, 120/240V).
- Confirm the generator outlet type (e.g., L14-30 for 30A, 4-prong).
4. Tools & Materials You’ll Need
For a typical manual generator transfer switch install:
Tools:
- Insulated screwdrivers
- Drill & bits
- Wire stripper / cutter
- Voltage tester or multimeter
- Knockout punch (if needed for conduit)
- Level, pencil, tape measure
- Safety glasses and gloves
Materials:
- Generator transfer switch kit (with wiring harness)
- Power inlet box (if not integrated)
- Appropriate cable (often included: flexible conduit / whip)
- Wire connectors / wirenuts as required
- Screws / anchors for mounting
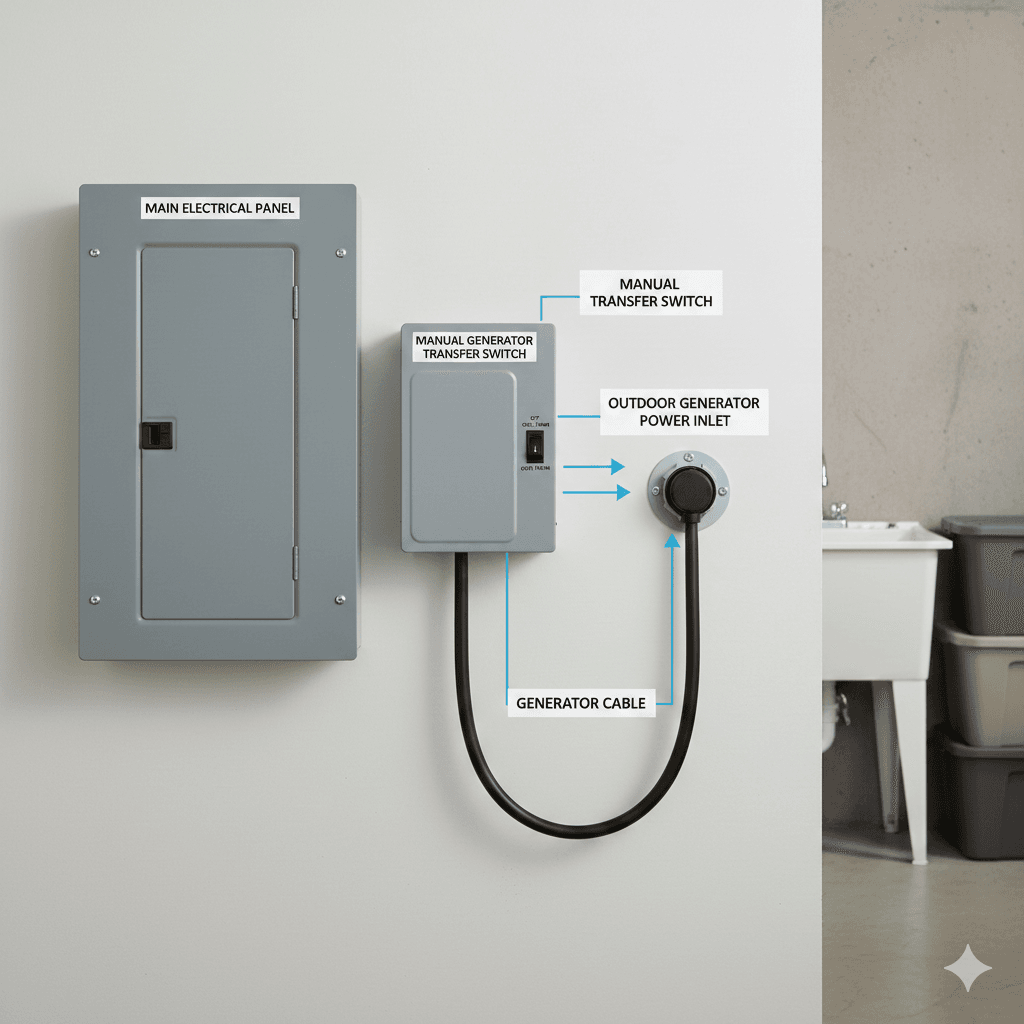
5. Understanding the Generator Transfer Switch Installation Diagram
Every kit comes with a generator transfer switch installation diagram and a generator transfer switch kit wiring diagram. They all vary slightly, but the core idea is the same:
Imagine:
- Your main breaker panel is a box where utility power comes in and is distributed to circuits.
- The transfer switch is a “sidecar” that sits next to the panel and intercepts selected circuits.
For each chosen circuit:
- The hot wire from the circuit is moved from the main breaker panel to the transfer switch.
- A new wire from the transfer switch is connected back to the original breaker.
- The transfer switch acts like a 3-way selector:
- Position 1: LINE (utility power)
- Position 2: OFF
- Position 3: GEN (generator)
So the wiring diagram usually shows:
- Feed from generator inlet → transfer switch.
- Transfer switch → selected circuits.
- Transfer switch → back to main panel breakers.
Even if you don’t see the exact drawing here, the manufacturer’s diagram will show:
- Wire colors and labels (e.g., A1, A2, B1, B2).
- Connections to breakers.
- Neutral and ground bus bar connections.
6. Step-By-Step Generator Transfer Switch Kit Installation
⚠️ ALWAYS shut off and verify power is off before touching any conductors. If any step confuses you, stop and call an electrician.
Step 1 – Turn off power and open the panel
- Turn off or unplug sensitive electronics in the home.
- Switch off all individual breakers.
- Turn off the main breaker to cut power from the utility.
- Use a voltage tester to verify that the bus bars are de-energized.
- Remove the panel cover (dead front) to access the breakers and wiring.
Step 2 – Mount the transfer switch
- Choose a location next to or very near the main panel so the whip can reach.
- Hold the transfer switch against the wall and mark mounting holes.
- Drill and install anchors if needed.
- Mount the transfer switch securely and level.
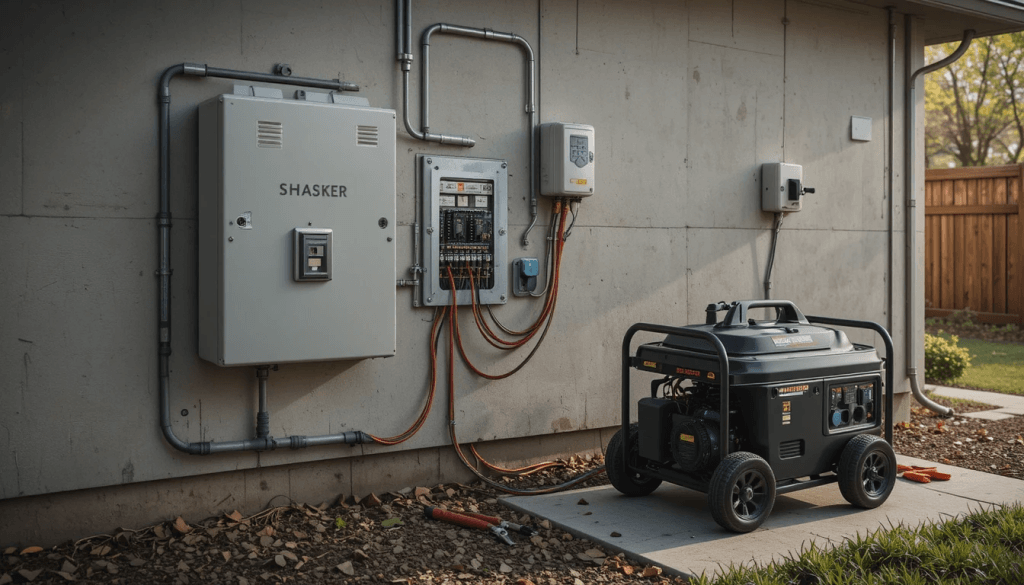
Step 3 – Install the power inlet box (for portable generators)
- Pick an outdoor location near where your generator will sit (usually on an exterior wall).
- Drill a hole through the wall to route the cable or conduit from the inlet box to the transfer switch.
- Mount the generator inlet box outside, facing down or protected from direct rain.
- Run the supplied cable / conduit from the inlet box to the transfer switch knock-out.
- Secure with proper cable clamps or conduit fittings.
This is the part that connects your generator cord to the house.
Step 4 – Route the wiring harness (whip)
Most kits come with a pre-wired harness (a flexible conduit with wires inside):
- Knock out a hole in the side of the main panel (use an existing knockout if possible).
- Knock out a matching hole in the transfer switch.
- Attach the conduit from the transfer switch to the main panel, following the kit’s instructions.
- Gently pull the labeled wires into the main panel, being careful not to nick insulation.
Each wire is usually labeled according to the switch or circuit (e.g., A, B, C, etc.).
Step 5 – Identify and prepare the circuits
- Decide which breakers will be controlled by the transfer switch (you may have already planned this).
- Confirm that the total amperage/wattage fits your generator capacity.
- Working one circuit at a time:
- Turn that breaker off.
- Note what it feeds (e.g., “Kitchen lights”).
- Label it if not already labeled.
Step 6 – Move each circuit through the transfer switch
Exact connections vary by kit, so always follow the included generator transfer switch installation instructions and wiring diagram. Below is the general concept.
For each selected circuit:
- Remove the hot wire from the breaker in the main panel.
- Connect that hot wire to the matching wire from the transfer switch harness (often using wirenuts or terminals, as specified).
- Connect the paired wire from the harness back to the original breaker.
So:
- Original circuit hot → transfer switch
- Transfer switch → back to breaker
The neutral and ground for each circuit usually stay in the main panel on their respective bus bars, unless your kit specifically instructs otherwise.
Repeat for each circuit (A, B, C, etc.) until all chosen circuits are routed through the transfer switch.
Step 7 – Connect the generator feed to the transfer switch
- Inside the transfer switch, locate the wires or terminals from the generator inlet.
- Connect them to the main lugs or terminals specified in the wiring diagram (typically two hot legs, one neutral, and a ground).
- Make sure all connections are tight and secure.
Step 8 – Double-check everything & close the panels
Before energizing:
- All wirenuts tight and properly twisted.
- No bare copper exposed where it shouldn’t be.
- Wires neatly routed, not pinched.
- Transfer switch labels match the circuits they control.
- Panel cover and transfer switch cover can close properly.
Replace the dead front and panel cover.
7. Testing Your Generator Transfer Switch Install
Now you’ll test your generator transfer switch installation in a controlled way.
Step 1 – Simulate an outage
- Turn off or unplug sensitive electronics (again).
- Turn off the main breaker (simulate loss of utility power).
- Make sure all transfer switch toggles are in the LINE or OFF position.
Step 2 – Start the generator
- Move outside to the generator.
- Plug the generator cord into the generator and into the power inlet box.
- Start the generator and let it warm up for a couple of minutes.
Step 3 – Transfer circuits to generator power
- At the transfer switch, move one circuit at a time from OFF or LINE → GEN.
- Listen and observe:
- Does the fridge turn on?
- Do the lights work?
- Is the generator laboring too hard?
- Gradually switch other circuits to GEN, watching the generator’s load indicator if it has one.
If everything works:
- You’ve successfully completed the generator transfer switch kit installation.
- Switch all circuits back to OFF/LINE, shut down the generator, then turn the main breaker back on to restore utility power.
8. Generator Transfer Switch Kit Install Cost (DIY vs Electrician)
DIY install cost
Approximate numbers (will vary by country and brand):
- Manual transfer switch kit (6–10 circuits): $200 – $500
- Power inlet box & cord (if not included): $80 – $250
- Miscellaneous materials (anchors, conduit bits, etc.): $20 – $50
If you already own the tools, your DIY generator transfer switch kit install cost is mostly the cost of the kit itself.
Professional install cost
If you hire a licensed electrician:
- Labor: typically $300 – $800+ depending on:
- Number of circuits
- Difficulty of routing conduit
- Local labor rates
- Whether panel upgrades or permits are needed
- Total installed cost (parts + labor): commonly $500 – $1,500+
Although DIY is cheaper, a pro install gives you:
- Code-compliant work
- Inspection & sign-off (where required)
- Peace of mind for safety & insurance
9. When You Definitely Should Not DIY
Skip the DIY route and call a pro if:
- Your main panel has no spare room or is a mess of unlabeled wires.
- You have older electrical systems (fuses, very old breakers, aluminum wiring).
- Your jurisdiction forbids homeowner electrical work on service equipment.
- You’re installing an automatic transfer switch integrated with a standby generator and gas line.
- You feel nervous or unsure at any step reading these generator transfer switch installation instructions.
Your life and safety are worth more than saving a few hundred dollars.
10. Quick FAQ
“Can I install a generator transfer switch myself?”
Yes, some homeowners can, especially for a manual transfer switch kit and a portable generator, if:
- Local code allows it,
- You’re comfortable working in the main panel,
- You follow the generator transfer switch kit wiring diagram exactly, and
- You test the system thoroughly.
If any of that doesn’t sound like you, hire a pro.
“Do I need a permit?”
Often yes, because you are modifying the home’s electrical system. Check with your local authority or your electrician.
“Do I still need extension cords?”
No, that’s the beauty of a proper generator transfer switch install. You’ll power circuits directly instead of running cords through windows or doors.
You may also like to see: Cummins Fault Code Lists